Many people are wondering how to speed up Windows XP, because they have found that their computer performance has degraded over time. For the many people that use Windows XP, having a slow computer is a major annoyance and source of frustration. But thankfully, oftentimes this problem is easy to fix.
A part of the Windows XP operating system, known as the registry, may easily be what is causing your computer to run slow. Even the computers with the most advanced and expensive hardware can still have problems with their registry.
Millions of computers that are running slow are slow due to a registry problem. But thankfully, you can learn how to speed up Windows XP by fixing the registry.
The registry is essentially a database for the Windows operating system that stores all of the information and settings needed to run your computer.
All of the information related to tasks on the computers, such as programs or even simple web pages, is stored in the registry. It is clearly vital to Windows XP, but unfortunately it is very commonly plagued with issues that make it run slowly.
Because the registry is so important to the proper functioning of Windows XP,it is used and modified constantly as you use your computer. Everything you do on your computer uses and changes registry systems, which over time can lead to a number of problems with the files in the registry.
The reason your computer runs slow is mostly because the registry is filled with corrupt and damaged files. This means that your computer will not be able to read the files fast enough, which slows down the speed of your computer. So if you want to figure out how to speed up Windows XP, you need to learn how to fix the registry.
All kinds of computers running a version of Windows suffer from problems with the registry, but thankfully you can fix problems with your registry and get your computer functioning at its highest performance level by using a simple registry cleaner tool.
Thursday, December 24, 2009
7 Easy Ways to Make Windows Start-Up Faster, Instantly
Do you face the frustrating problem of slow Windows XP start-up? Here are some easy steps to follow to speed up the booting process in your computer.
1. Removing virus and cleaning your registry- This is the most important and easiest thing to do! Getting rid of viruses and repairing broken registry files can help in many ways including faster boot ups. You can use registry cleaners to easily and quickly clean Windows registry.
2. Boot defragmenting - when you perform a boot defragment on your system, all the boot files are placed together, right next to each other, on the hard disk. This obviously can speed up the windows xp slow to start problem you face. Usually of course this option is enabled but there is no harm in making sure by running the registry editor, going to the Hkey_local_machine software MS Dfrg BootOptimizeFunction and checking if it is "Y". Else set it to "Y" and reboot your system.
3. Hard disk maintenance - You can start with defragmenting the hard disk. This could give better access to data which in turn makes your computer start faster. When the disk is fragmented, data is stored in multiple areas; this means it has to be searched and put together before being used. You can use the "Disk Defragmenter" option in the System Tools. Hard disks develop bad sectors over a period of time; it will be a good idea to scan for them and repair them. This can be taken up as a periodic exercise to get freedom from windows xp slow to start.
4. Getting more memory or using a Flash memory - installing more RAM instantly speeds up the start up process. You could get a flash drive like a USB thumb drive/ SD card and use special programs to speed up performance using the drive inserted in the USB port.
5. Removing programs during start up - there may be a number of applications that automatically are set to load up when the computer boots. Removing unwanted ones can speed up booting substantially.
6. Display setting optimization - by tweaking the visual effects and toning them down completely you can realize a huge improvement in windows xp slow to start.
7. Doing away with the indexing option - the index option is ON to help you carry out file searches faster. But if you know your file locations you might hardly ever need to search and in such a scenario the indexing option can be OFF. This saves a lot of CPU effort.
Wednesday, December 2, 2009
Hide Notification Balloons
It may be very annoying when Windows popping up a balloon notification telling you things you already know every time you turn on your machine, here is a tip on permanently disabling them.
You should note that this will disable all balloon notifications, so proceed with caution.
Steps:
1. Click on Start \ Run and type in regedit
2. Now we will navigate to this path in your registry.
HKEY_CURRENT_USER\Software\Microsoft\Windows\CurrentVersion\Explorer\Advanced
3. On the right pane right click on an open area and choose New \ DWORD Value
4. You will see New Value #1. Change this to EnableBalloonTips.
5. Next double click the new registry entry you created. In the Value Data field set it to 0 (zero). Make sure Hexadecimal is selected under Base. Click OK.
6. Finally restart your system and enjoy the clean boot up with no balloons popping up at you.
Note: To undo the changes simply change the value to 0 from 1.
Directly Boot To the desktop in Windows XP Home / Professional
If you want to log in to your desktop directly after rebooting, you can automate the login process easily.
Note: For security reasons, you would usually want to have a password, but for a home computer you may not care.
Steps to be followed to skip log in screen
1. Go to the Start menu, click Run, and type in the following:
control userpasswords2
You will be presented with a window similar to this one:
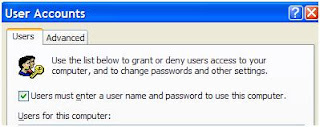
Uncheck the box, and click the OK button. You will be presented with a password dialog for the currently logged in user.
Now when you reboot your system, you will automatically be logged in.
This can be very useful when you are installing a bunch of software or testing out configurations and want to save time.
Tuesday, December 1, 2009
Fix "My Computer" Opening Slowly in Windows XP
Sometimes “My Computer” takes a really long time to open, it is a very well-known issue where Windows hangs while trying to search for network folders and printers before displaying anything to you.
The steps to resolve this issue are very easy, and most of us are probably familiar with the fix already, but we’ll go through it anyway:
1.Open up Folder Options from the Tools menu in Windows Explorer:
2.Then choose the View tab.
3.Uncheck the box for “Automatically search for network folders and printers”, and close the dialog.
4.The changes should be immediate, and your problem should be gone.
Steps to Share Files and Printers between Windows 7 and XP
If you are running Windows 7 and have XP on PC(s) you might want to share files between them. The following are the steps to share files and hardware devices like a printer.
Sharing Files In Windows 7 and XP
Sharing folders between two Windows 7 machines with the new HomeGroup feature is an easy process, but the HomeGroup feature is not compatible with Vista or XP. For this tutorial we are using Windows 7 x64 RC1 and XP Professional SP3 connected through a basic Linksys home wireless router.
First make sure both machines are members of the same Workgroup which by default is named Workgroup.
On the Windows 7 machine go into Control Panel \ All Control Panel Items \ Network and Sharing Center then click on Change advanced sharing settings.
You will want to verify the following settings under Advanced Sharing Settings for the Home or Work and Public profile.
If you want any user to have access the public shares turn off password protection. This is located in Advanced Sharing Settings toward the bottom of the list.
If you want to keep it enabled make sure there is a log in account for the other XP machines and they have a password.
Now if you go into Network in Windows 7 you should see your XP machine and the Windows 7 as well.
To share the printer on the Windows 7 machine go into Devices and Printers from the Start menu and double click on the printer icon.
Next double click on “Customize your printer”.
In the Properties screen click on the Sharing Tab and check the box to share the printer and type in its share name.
If your XP machine is an x86 OS you can install Additional Drivers before setting up the XP machine.
To find the shared folders and devices double click on the Windows 7 machine icon under Network. Here you can see the printer connected to my Windows 7 machine is shared and also the Users Folder.
Continue into the Users folder and Public to see the shared folders, here I also created a folder called XP Share just to keep everything in central location.
Over on your XP machine open up My Network Places to find the Windows 7 shared folder.
Double click on the Share folder to find a list of shared folders in the Public folder on Windows. If you have password protection enabled you will need to type in the username and password of the user account on the Windows 7 machine first.
Setup XP With Shared Printer
To set up the shared printer in XP you will need to go into Printers and Faxes from the Start menu and kick off the Add Printer Wizard.
Now select “A network printer, or a printer attached to another computer” then hit Next.
Next select “Connect to this printer…” and type in the path for the printer connected to the Windows 7 machine and click next.
Now click Yes to the confirmation message.
Then click Finish the printer to install and complete the Wizard.
In some cases you will need to install the x86 XP drivers for the shared printer because the Windows 7 drivers are not compatible with XP. When everything is installed open up Printers and Faxes to find the shared printer.
This should help you get started with sharing your files and other devices with your Windows 7 machine.
Monday, November 30, 2009
Identify your Systems Uptime
Uptime is a measure of the time a computer system has been "up" and running.
The system uptime is very important for system administrators. Many times normal users like to keep the track of their PC.
Here I am showing 5 ways (Some Commands and Some Very Small and Free Utilities) to know How long has Your System been Running without Reboot.
• Using systeminfo command
The systeminfo command tells us all about a computer system. Here you can get the system uptime as well as the original date and time of the OS installation. This command works on Windows XP.
1. Click on Start > Run
2. Type CMD (Will open Command Terminal)
3. Type systeminfo
4. Find system uptime there, you will also get install date and time above the uptime
It also displays detailed configuration information about a computer and its operating system, including operating system configuration, security information, product ID, and hardware properties, such as RAM, disk space, and network cards.
Automate Disk Cleanup
Disk Cleanup (cleanmgr.exe) is a computer maintenance utility included in Microsoft Windows designed to free up disk space on a computers' hard drive. The utility first searches and analyzes the hard drive for files that are no longer of any use, and then removes the unnecessary files. There are a number of different file categories that Disk Cleanup targets when performing the initial disk analysis:
• Compression of old files
• Temporary Internet files
• Temporary Windows file
• Downloaded Program files
• Recycle Bin
• Removal of unused applications or optional Windows components
• Setup Log files
• Offline files
You can use command-line options to specify that Cleanmgr.exe cleans up certain files. You can then schedule the task to run at a specific time by using the Scheduled Tasks tool.
To start the Disk Cleanup tool, either run the Cleanmgr.exe command, or click Start, point to Programs, point to Accessories, point to System Tools, and then click Disk Cleanup.
Disk Cleanup supports the following command-line options:
• /d driveletter: - This option specifies the drive that you want Disk Cleanup to clean.
• /sageset: n - This option displays the Disk Cleanup Settings dialog box and also creates a registry key to store the settings that you select. The n value, which is stored in the registry, allows you to specify tasks for Disk Cleanup to run. The n value can be any integer value from 0 to 65535. To have all of the options available when you use the /sageset option, you might need to specify the drive where Windows is installed.
• /sagerun: n - This option runs the specified tasks that are assigned to the n value if you use the \sageset option.
For example, in Scheduled Tasks, you could run the following command after you run the cleanmgr /sageset:11 command:
cleanmgr /sagerun:11
This command runs Disk Cleanup and includes the options that you specified with the cleanmgr /sageset:11 command.
Sunday, November 29, 2009
Get Rid Off User Accounts from the Login Screen in Windows XP
Sometimes it is very annoying to see more than one user account on the login screen. So how we can hide that other user account from the login screen?
There’s a simple step which can use to hide accounts from the login screen, or we could alternatively delete the user account if you really don’t need it. Both methods are listed below.
Manual Registry Hack
Open up regedit.exe through the start menu Run box, and then navigate down to the following key:
HKEY_LOCAL_MACHINE\SOFTWARE\Microsoft\Windows NT\
CurrentVersion\Winlogon\SpecialAccounts\UserList
On the right-hand side you’ll see a list of keys that correspond to user accounts that are considered “Special” and are not to be shown on the login screen.
Create a new DWORD value with the same name as the user name that you want to hide and give the value as 0. To unhide the account, simply delete the registry key that you created.
The next time you log off you’ll see that the other account is gone.
Login to Hidden Account
You can still login to the account even though it’s not shown… You’ll just have to use a little trick.
At the login screen, just hit the Ctrl+Alt+Delete combination twice in a row, and you’ll be presented with the old-school login screen, where you have to manually enter the username.
Type the name and password of the hidden User account, and login.
How To Delete User Account
Alternatively you can always delete the user account if you are absolutely sure that you don’t need that user account anymore. Right-click on “My Computer” and choose “Manage”
Navigate down through “Local Users and Groups” and then Users, and then locate the username in the list that you’d like to get rid of.
Just right-click and choose Delete. Note that this step cannot be reversed, so make sure you only delete accounts you really really don’t want anymore. If you are unsure, you can just hide them using the first option above.
Disable Autoplay feature for Audio CDs and USB Drives
Sometimes it is very annoying when we plug laptop into my external hard drive… The Autoplay window pops up and asks what we want to do with the files, which may be fine the first time, but definitely isn’t after a year of that.
The following are the steps to disable Autoplay of Audio Cds and USB drives:
Go to Start Menu \ Run and type in:
gpedit.msc
You will see the Group Policy window. You should select Administrative Templates and then System in the tree view:
You will see an item in the right side pane called “Turn off Autoplay”
Double click the item, and set the radio button to Enabled, and change the “Turn off Autoplay on” to All Drives.
Now you should be safe from the autoplay problem.
Perform Disk defragmentation On Multiple Hard Drives At Once In Windows
Windows XP does not include a way to defragment all hard drives at the same time, which is hard when we have more than one hard drive in our computer.
The technique we are going to use is by creating a batch file to defragment all of the drives, one after the other.
The disk defragmentation utility in Windows XP can be triggered from the command line with the following syntax:
Windows Disk Defragmenter
Copyright (c) 2001 Microsoft Corp. and Executive Software International, Inc. Usage:
defrag [-a] [-f] [-v] [-?]
volume drive letter or mount point (d: or d:\vol\mountpoint)
-a Analyze only
-f Force defragmentation even if free space is low
-v Verbose output
-? Display this help text
First, we’ll create a file named defragmentall.bat, and place it anywhere you like, as long as you’ll remember where it is. If you want to run it from the command line, you could place it in the \windows directory so that it will be available in the system path.
For each hard drive, add a line to the batch file. For instance, if we want to defragment drives C: , D: , and F: we will add these three lines:
defrag c: -f
defrag d: -f
defrag f: -f
To run the defrag, just either double-click on the batch file or start it from the command line.
The technique we are going to use is by creating a batch file to defragment all of the drives, one after the other.
The disk defragmentation utility in Windows XP can be triggered from the command line with the following syntax:
Windows Disk Defragmenter
Copyright (c) 2001 Microsoft Corp. and Executive Software International, Inc. Usage:
defrag
volume drive letter or mount point (d: or d:\vol\mountpoint)
-a Analyze only
-f Force defragmentation even if free space is low
-v Verbose output
-? Display this help text
First, we’ll create a file named defragmentall.bat, and place it anywhere you like, as long as you’ll remember where it is. If you want to run it from the command line, you could place it in the \windows directory so that it will be available in the system path.
For each hard drive, add a line to the batch file. For instance, if we want to defragment drives C: , D: , and F: we will add these three lines:
defrag c: -f
defrag d: -f
defrag f: -f
To run the defrag, just either double-click on the batch file or start it from the command line.
Delete Browsing History in Internet Explorer7 From the Command Line
Everyone likes to create a batch file to automate cleanup on their systems, and probably want to include at least one of these commands in their batch script.
We can automate any one of the functions on the Internet Explorer 7.
And here are the commands that correspond to the different buttons. The most important one from a cleanup perspective is the first, which will delete just the temporary internet files that are cluttering up your computer.
To use these commands, just run them from the command line,
Temporary Internet Files
RunDll32.exe InetCpl.cpl,ClearMyTracksByProcess 8
Cookies
RunDll32.exe InetCpl.cpl,ClearMyTracksByProcess 2
History
RunDll32.exe InetCpl.cpl,ClearMyTracksByProcess 1
Form Data
RunDll32.exe InetCpl.cpl,ClearMyTracksByProcess 16
Passwords
RunDll32.exe InetCpl.cpl,ClearMyTracksByProcess 32
Delete All
RunDll32.exe InetCpl.cpl,ClearMyTracksByProcess 255
Delete All – “Also delete files and settings stored by add-ons”
RunDll32.exe InetCpl.cpl,ClearMyTracksByProcess 4351
These commands should work in Internet Explorer 7 on XP or on Windows Vista.
Friday, November 27, 2009
About Windows XP
Microsoft Windows XP is a line of operating systems produced by Microsoft for use on personal computers, counting home and business desktops, laptops, and media centers. It was released in 2001. The name "XP" abbreviates "eXPerience".
Windows XP is the successor to both Windows 2000 Professional and Windows Me, and is the first consumer-oriented operating system produced by Microsoft to be built on the Windows NT kernel and architecture. Windows XP was first released on October 25, 2001, and over 400 million copies were in use in January 2006, according to an estimate in that month by an IDC analyst. It was succeeded by Windows Vista, which was released to volume license customers on November 8, 2006, and worldwide to the general public on January 30, 2007. Direct OEM and retail sales of Windows XP ceased on June 30, 2008. Microsoft continued to sell XP through their System Builders (smaller OEMs who sell assembled computers) program until January 31, 2009. XP may continue to be available as these sources run through their inventory or by purchasing Windows Vista Ultimate or Business and then downgrading to Windows XP.
The most common editions of the operating system are Windows XP Home Edition, which is targeted at home users, and Windows XP Professional, which offers additional features such as support for Windows Server domains and two physical processors, and is targeted at power users, business and enterprise clients. Windows XP Media Center Edition has additional multimedia features enhancing the ability to record and watch TV shows, view DVD movies, and listen to music. Windows XP Tablet PC Edition is designed to run stylus applications built using the Tablet PC platform.
FAQ
FAQ About Windows Vista
- About Windows XP
- How to install Windows XP
- Different Available Version of Windows XP
- How to Upgrade Windows 98 to Windows XP
- Windows XP Hardware Requirements
Contact
Get 24/7 online computer help and support for all of your computer repair needs with PcCare247 Online Technical Support Services.
You can reach us at www.pccare247.com or Call Us @ +91 - 124 - 4655208
Corporate Office
Connexxions Infotech Services (P) Ltd.
Office No. 2G, Ground Floor,
DLF Cybercity, Building No. 10C,
Gurgaon, Haryana - India
Cell : +91 - 9650660044
Landline : +91 - 124 - 4655208
Fax : +91 - 124 - 4655299
E-mail : karan.agrawal@iconnexxions.com
Subscribe to:
Posts (Atom)